
So you’ve got an idea. Maybe it hit you mid-game of Monopoly when you thought “I could design something way better than this.” Maybe you’ve been sketching mechanics on napkins for months. Either way – you want to create your own board game, and you have no idea where to start. Good news: making your own board game is more achievable than it sounds. You don’t need a publisher, a budget, or years of experience in game design. You need an idea, some cardboard, and a willingness to iterate. This step-by-step guide will walk you through the whole process – from the first brainstorming session to a playable game on the table. At Geeknson, we have a soft spot for people who make things. Designing board games is one of the most creative things a tabletop fan can do – and honestly, there’s no better place to prototype and playtest your creation than at a proper gaming table. Our tables are built for exactly that kind of focused, serious play session.
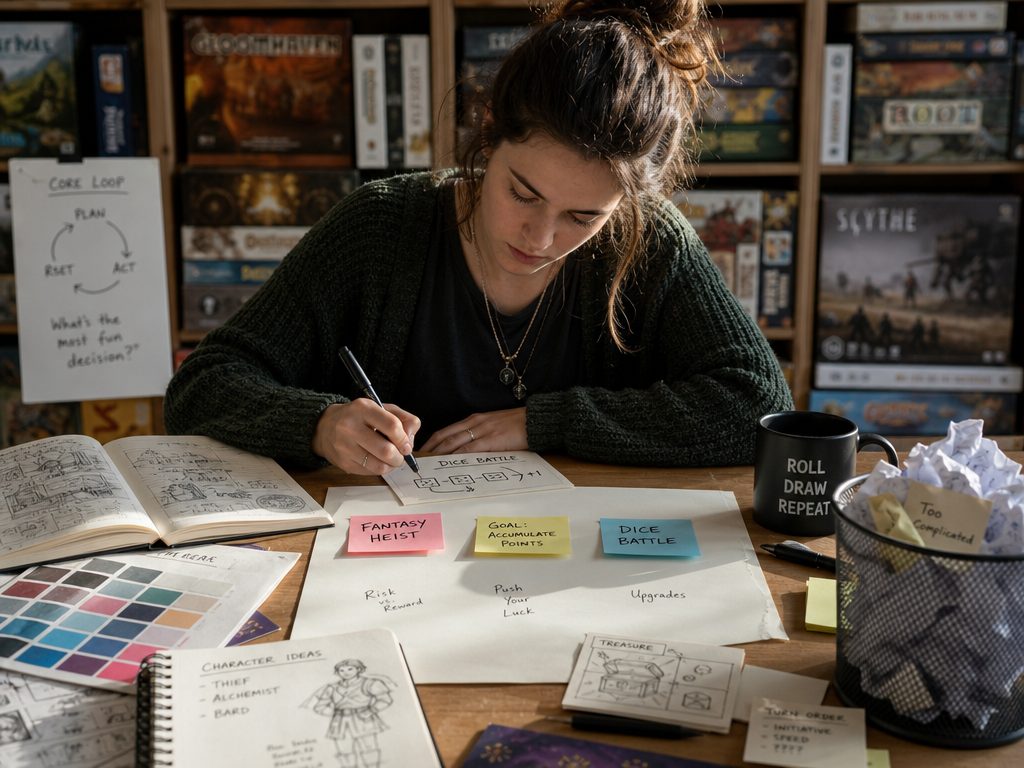
Step 1 – Board Game Design Starts with a Core Idea
Before you touch any cardboard, you need to nail down your concept. Every great game starts with a clear answer to one question: what is this game about and why is it fun?
Start your brainstorming by thinking about three things:
- Theme – What’s the setting or story? Fantasy heist, space exploration, a deck-building dungeon crawl, a domino-style tile placement game? Theme gives your board game personality.
- Goal – How does a player win the game? Accumulate the most points, be the first to reach a destination, eliminate opponents, build the best engine?
- Core loop – What does a player actually do on their turn? This is the heart of your game mechanics and the thing players will repeat dozens of times per session – it needs to feel intuitive and satisfying.
New designers often try to pack too many ideas into their first game. Resist that urge. The best games usually have one strong, clear mechanic executed really well. Write down your rules in plain language before anything else – if you can’t explain the game in a few sentences, it needs more focus.
Step 2 – Understanding Game Mechanics
Game mechanics are the rules and systems that make a board game work. They’re the difference between a game that’s like a game and one that actually is one. Spend time playing and analysing different game styles before you commit to your own design.
Some common mechanics worth knowing:
- Deck-building – Players start with a basic deck and acquire new cards throughout the game to build a more powerful hand.
- Tile placement – Players place tiles to build the game board as they go, creating an evolving shared space.
- Dice-based resolution – Dice determine outcomes. Worth thinking about what each of the die faces represents and how randomness affects the overall experience.
- Hand management – Players manage a set of game cards in hand, choosing when and how to play them.
- Area control – Players compete to dominate regions of the game board using tokens, cubes, or other components.
You don’t need to reinvent the wheel. The best games often take a familiar mechanic and put a fresh spin on it. Knowing what already exists in tabletop gaming helps you build on it rather than accidentally recreating something that already exists.
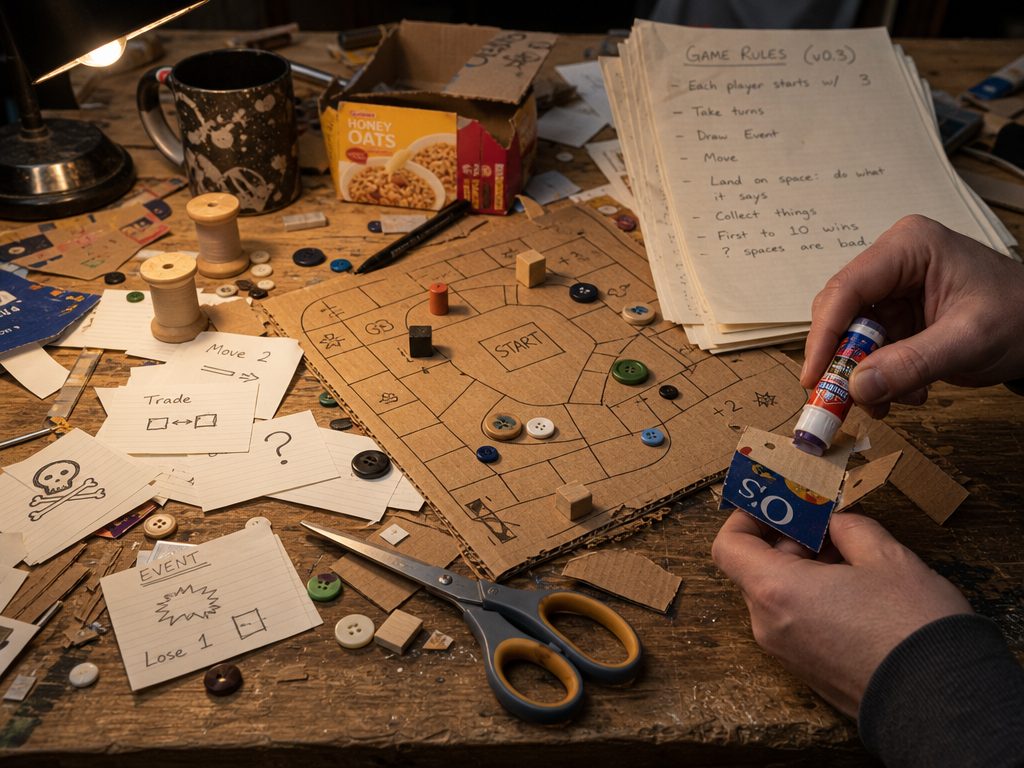
Step 3 – Build Your First Prototype
Here’s where designing board games gets real. Your first prototype doesn’t need to be pretty – it needs to be playable. Grab some cardboard, scissors, a pen, and whatever spare components you have lying around. Dice from other games, coins, bits of paper – all fair game.
For a basic DIY board game prototype you’ll typically need:
- A game board – drawn on paper or cardboard, as rough as needed
- Game cards – index cards work perfectly for this stage
- Tokens or markers – coins, cubes, or cut-up cardboard pieces
- Dice – standard six-sided dice are fine to start
- A written rules document – even just a page of notes
The goal of this first prototype is to make a board game using the simplest possible materials that lets you actually play through your concept. Don’t spend time on graphic design or artwork yet. You’re going to change almost everything anyway.
We’ve seen some beautifully chaotic first prototypes at Geeknson – hand-drawn cards, sticky-note game boards, dice borrowed from three different games. That’s completely normal and honestly part of the charm. The point is getting it to the table, not making it look like it came from a publisher.
Step 4 – Write Down Your Rules (Properly)
Once you have a prototype, write down your rules in full. Not bullet points – an actual tutorial-style document that someone who has never seen your game could pick up and follow.
A solid rules document covers:
- The goal of the game and how to win
- Setup instructions – what the game board looks like at the start, how many game cards each player gets, where dice and other components go
- Turn structure – exactly what a player can do on their turn, in order
- Special rules and exceptions
- How the game ends
Writing rules forces you to confront gaps and contradictions in your design that playtesting alone won’t always catch. If you find yourself writing “and then, somehow, the player…” – that’s a mechanic that needs more work.
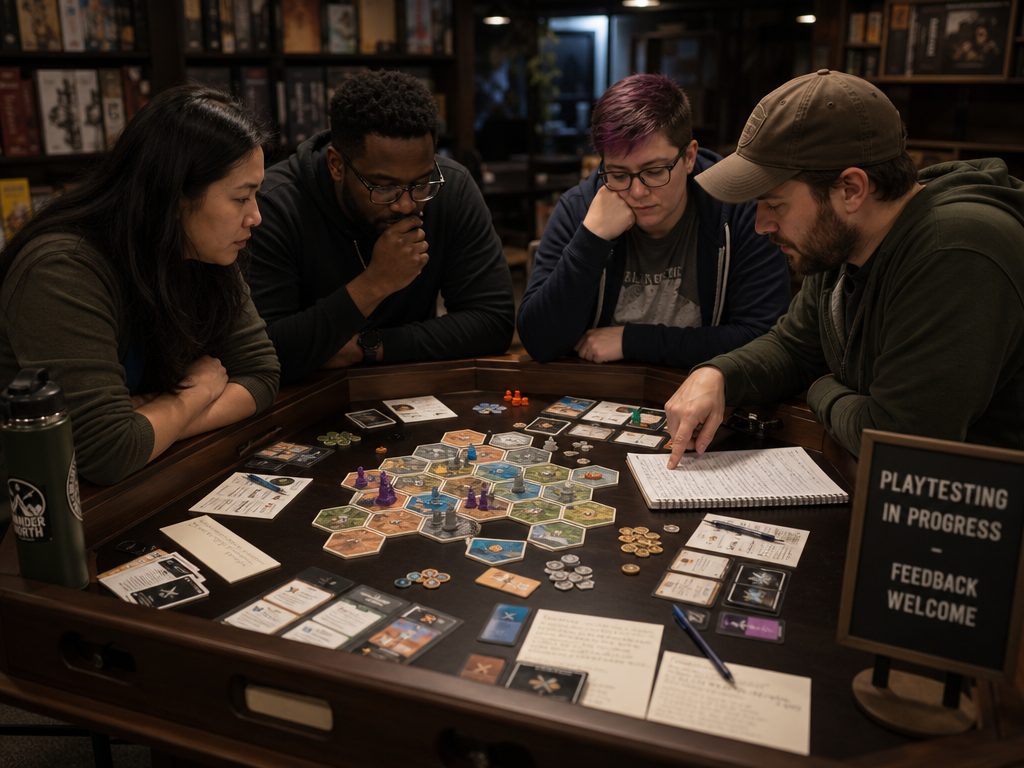
Step 5 – Playtesting
Playtesting is where board game design lives or dies. Play your game. Play it again. Then get other people to play it and watch them without explaining anything. The moments where they get confused or frustrated are your most valuable data points.
What to watch for during playtesting:
- Is the game too long or too short?
- Is one strategy clearly dominant – does one player always win by doing the same thing?
- Are players engaged throughout, or do they check out halfway through?
- Are the rules intuitive, or do players keep asking the same questions?
- Is there a meaningful decision to make on every turn, or do players feel like they’re just going through the motions?
Don’t defend your game during playtesting. Just observe and take notes. Your playtesters are doing you a favour – let them be honest. Get feedback from as many different types of players as you can: hardcore gamers, casual players, people who have never touched a board game in their life.
This is where a Geeknson table really earns its place. A proper gaming surface – the right size, the right height, built for extended sessions – makes playtesting more comfortable and more focused. When players are physically comfortable, they stay in the game longer and give you better feedback. We’ve had designers run full playtesting sessions at our tables and the difference in session quality versus a kitchen table is genuinely noticeable.
Step 6 – Iterate, Iterate, Iterate
After each playtesting session, update your prototype. Change one or two things at a time so you can isolate what actually improved the gaming experience. Designing games is a loop: play, observe, adjust, repeat.
Some changes will be small – tweaking numbers, adjusting dice probabilities, rewriting a single rule. Others will be fundamental – removing an entire mechanic, rethinking the win condition, redesigning the game board from scratch. Both are completely normal, especially on your first project.
The best games go through dozens of iterations before they’re ready. The original versions of even the most celebrated board games looked nothing like the final product. Building the game is a long process – embrace it rather than rush it.
Step 7 – Design Your Board and Components Properly
Once your core mechanics are solid and playtesting is going well, it’s time to think about proper board game design – the visual layer. This is where graphic design comes in.
You don’t need to be a professional designer. Free tools like Canva, Inkscape, or Google Slides can get you surprisingly far. Focus on:
- Clarity over beauty – every element on the game board should communicate its purpose at a glance
- Consistent visual language – use the same colours, icons, and typography throughout
- Player-facing information – can players read and understand their game cards, tokens, and the board without squinting or asking questions?
For physical printing, sites like The Game Crafter, PrintPlayGames, and similar third party services let you print professional-quality components without a large minimum order. These are brilliant for producing a polished prototype or a small run of copies to share.
Step 8 – Putting Your Game Out into the World
Once you have a polished, well-tested game, you have options. You can share it digitally – Tabletop Simulator and Board Game Arena let you bring your game online so playtesters anywhere in the world can try it. Sites like Board Game Geek have active communities of new designers sharing work and looking for feedback. Instructables is another great platform for sharing DIY board game projects step-by-step.
If you want to go further, you could self-publish via print-on-demand third party services, pitch to a publisher, or run a crowdfunding campaign. But even if none of that is the goal – even if you just want to create your own board game to play with friends and family – finishing a playable game from scratch is genuinely one of the most satisfying things a board game fan can do.
Quick Step-by-Step Summary for Designing Games
- Define your concept – theme, goal, and core loop
- Choose and understand your game mechanics
- Build a rough prototype with basic materials
- Write down your rules in full
- Playtest with real players and take notes
- Iterate based on feedback – repeat until it’s fun
- Design your board and components properly
- Share your game and get it to the table
Final Thoughts – Your First Board Game Won’t Be Perfect (That’s Fine)
Every game designer has a drawer somewhere full of abandoned first projects. That’s not failure – that’s the process. Your first game teaches you more about board game design than any tutorial, book, or video ever could. The goal isn’t to make the next big thing on your first try. The goal is to finish something, get it to the table, and learn from the experience.
Start simple. Playtest ruthlessly. Iterate without ego. And when you’ve got something you’re proud of – bring it to a proper table, gather your playtesters, and see what it’s made of. If you’re near a Geeknson table, even better. There’s nothing quite like seeing your own game come to life on a surface that was built for exactly this kind of moment.